
This is basically a continuation of the BlindPi except on a new Pi.
I kept the same SD card so everything I did before carried over.
I have a couple plans for this one, the first of which is setting up a VPN access point!
First things first, I need to download and install dnsmasq and hostapd.
sudo apt-get install dnsmasq hostapd
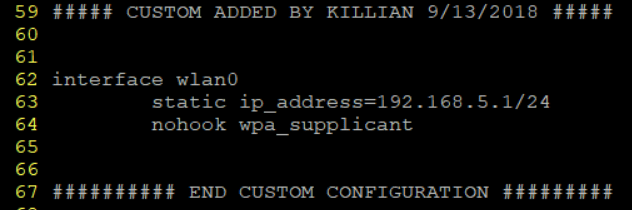
After those are installed, I will need to update my network settings so that wlan0 has a static IP so I can use it for my AP.
sudo vim /etc/dhcpcd.conf
Once I have this pulled up, I need to edit the wlan0 interface.
It actually looks like I will need to add some settings because nothing for wlan0 is populated yet.
sudo service dhcpcd restart
After that restarts, I will need to edit the dnsmasq config and create a hostapd configuration in order to setup the Access Point
Before editing the dnsmasq config, I am going to back up the original file.
sudo mv /etc/dnsmasq.conf /etc/dnsmasq.conf.bak
sudo vim /etc/dnsmasq.conf
Then I just need to setup an IP range for the clients. I am only using 40 addresses because I do not plan on having a ton of devices connecting.
After doing this, I realized I forgot to add the subnet mask to this configuration – make sure to do thisd!
Then onto hostapd.
sudo vim /etc/hostapd/hostapd.conf
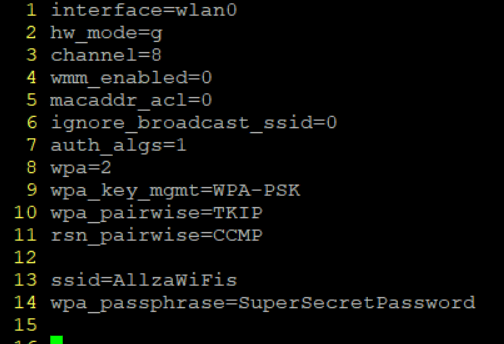
Next up, telling hostapd where the config lives
sudo vim /etc/default/hostapd

I made a mistake here and tried editing the DAEMON_OPTS line instead of DAEMON_CONF line, if the conf line is not enabled the AP will not show up!

Perfect! Now setting up traffic to forward to eth0 from wlan0
sudo vim /etc/sysctl.conf
Then search for net.ipv4.ip_forward=1 (/ searches in VIM – then n skips to the next result)

After that is saved, I need to set up IP Table rules to masquerade traffic.
This will allow machines connected to the PI to talk to the outside world using NAT
sudo iptables -t nat -A POSTROUTING -o eth0 -j MASQUERADE
sudo sh -c “iptables-save > /etc/iptables.ipv4.nat”
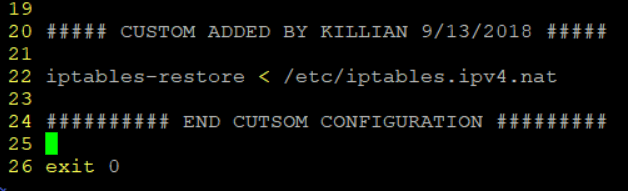
Then we need to set up the rules to work on boot
sudo vim /etc/rc.local
In this file, the following needs to go towards the end right before the exit command
iptables-restore < /etc/iptables.ipv4.nat
Now I should be good to restart the services and see the AP.
sudo service hostapd restart
sudo service dnsmasq restart
It looks like just restarting the services didn’t bring up the AP – a restart should do the trick.
sudo reboot
Now the AP is up and running – just without internet access for the clients.
Now we will install openvpn so I can setup my connection.
sudo apt-get install openvpn -y\
After that is installed, I will create an auth.txt file that I will point my config to use in order to log in.
sudo vim /etc/openvpn/auth.txt
In this file, I will put my username and password for my VPN.
😊
Now that that is done, t’s time to grab a VPN config file… Where do I want to live today?
Let’s go with the midwest. I copied over my ovpn file and renamed/moved it

Then I just need to edit the file and add auth.txt to the file.
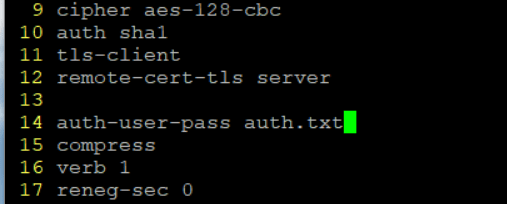
When I tried to test this, I noticed open VPN looks for auth.txt relative to where I am in the system, not where the config file is… this might be something to look at later.
Also, I added auth-nocache after auth-user-pass to prevent the credentials from being cached.
Note to self: to test:
sudo openvpn –config “/etc/openvpn/file.conf”
Now I need to update my IPTables rules. Before doing this, I will need to temporarily disable UFW as to not cause issues.
sudo ufw disable
one that is down it’s time to flush the iptables and add a new rule for tun0
sudo iptables -F
sudo iptables -t nat -F
sudo iptables -X
sudo iptables -t nat -A POSTROUTING -o tun0 -j MASQUERADE
Note: this is now tun0 whereas before it was eth0!
Then save the rules and re-enable ufw
sudo sh -c “iptables-save > /etc/iptables.ipv4.nat”
sudo ufw enable
Now that that is taken care of, I just have to edit the openvpn default config and I should be set.
sudo vim /etc/default/openvpn
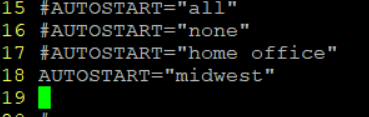
Then I add AUTOSTART=”midwest”
I do not think I need to use midwest.conf
Now the moment of truth
sudo reboot
It looks like upon reboot it created tun0 and has the configuration for wlan0 setup.
All that is left is to try and connect.
We are good!!!
BONUS!
Preventing DNS Leaks
Just for sopme extra security, I will setup custom DNS to prevent information leakage.
sudo vim /etc/dhcpcd.conf
Instead of deleting what is currently there, I will just add a new line (and wrap it with my banners because it’s a habit at this point).

Now we are all set and have a portable VPN hotspot!
